Language
 The Ultimate Guide to the Precure Tire Retreading Process
The recycling of resources is a powerful solution to alleviate natural rubber shortages. Mastering the Precure Tire Retreading (Cold Process) production flow is essential for sustainable resource management and high-quality tire reuse.
Below is the comprehensive step-by-step technical process for professional tire retreading.

1. Pre-Inspection Preparation
Before the process begins, organization and cleanliness are paramount:
• Initial Registration: Record the casing specifications, type, serial number, desired tread pattern, and customer name. We implement a "One Tire, One Card" system to ensure 100% traceability.
• Cleaning: Thoroughly clean and dry the casing. A comprehensive inspection can only be performed when the tire is free of debris and moisture.
2. Primary Inspection (NDE)
Using specialized tire testing machinery, we evaluate the casing's integrity:
• Tread Area: Check for belt separation, steel cord oxidation (rust), and depth of punctures. Excessive cracking or oversized holes render a casing non-retreadable.
• Shoulder Area: Use the percussion method (tapping the liner at the shoulders) to identify internal air pockets or belt edge separation. Casings with oxidized rubber or separation are rejected.
• Sidewall: Inspect for bulges caused by cord separation or wire breakage. Casings with sidewall blowouts or "zipper" failures are discarded.
• Inner Liner: Remove old patches and debris. Inspect for pinholes or injuries to determine the required patch strength. If more than 5 steel cords are broken in a single injury, the tire is unsuitable for retreading.
• Bead: Any deformation, cracking, or deep rust on the bead wires is a critical failure point.
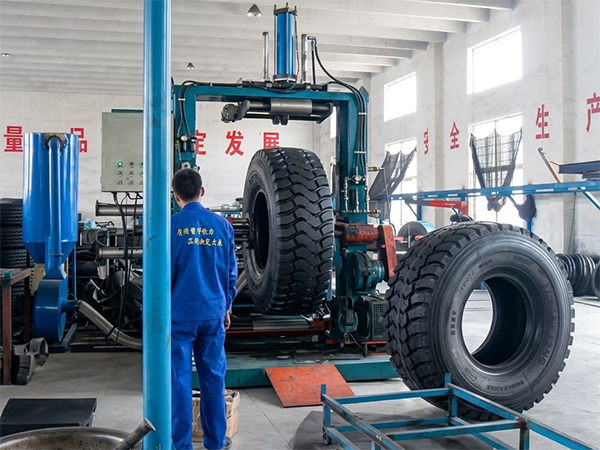
3. Casing Buffing
• Mounting: Select the appropriate rim to ensure airtightness and horizontal alignment. Standard inflation pressure: 0.2 – 0.3 MPa.
• The Buffing Path: Begin at the center of the tread. Do not move the rasp toward the shoulder until it has made full contact with the rubber. Ensure smooth, controlled movements to avoid gouging.
• Debris Removal: If the rasp hits metal or foreign objects, stop immediately to remove the debris and assess if the injury depth allows for further processing.
• Radius & Texture: Maintain a standard crown radius (typically 1° to 2° difference between the center and shoulders). The texture should be moderately rough (RMA 3-4) to facilitate bonding.
4. Skiving (Injury Preparation)
For Radial Tires:
• Use high-speed tools (15,000+ RPM) to open the injury and remove rusted cords or oxidized rubber.
• Use low-speed tools (4,000 RPM) with carbide burrs to grind cord ends back into the rubber.
• Clean the area with a wire brush to remove scorched rubber.
For Nylon (Bias) Tires:
• Use high-speed tools at a 90° angle to the nylon cords to ensure the cord ends are cleanly recessed into the rubber.
5. Casing Repair
• Select a patch of appropriate strength. Mark the area so the injury is perfectly centered.
• Buffing the Liner: Use specialized wheels for tubeless liners to maintain the integrity of the airtight layer.
• Application: After vacuuming debris and applying cement, apply the patch. Use a stitcher from the center outward to eliminate all air bubbles.
• Filling: If the injury requires significant rubber filling (extrusion), determine if spot-vulcanization is required beforehand.
6. Cementing and Surface Prep
• Clean the buffed surface with a wire brush (or solvent if contaminants are stubborn).
• Apply retread cement evenly using a brush or spray gun.
• Standard Ratio: 1:8. Mixing Time: 24 hours. The cement is ready when it forms a "stringy" consistency upon lifting the brush.
7. Filling and Plugging
• Preheat the extruder gun to the required temperature.
• For larger injuries, place a wicking cord (white cotton thread) from the injury to the shoulder to facilitate venting.
• Ensure the filler rubber is flush with the tread surface, ensuring zero air entrapment.
8. Tread Application (Building)
• Measurement: Confirm tread width and length. Buff the tread ends. Ensure joints are at least 20cm apart (max 2 joints per tire).
• Cushion Gum: Apply the cushion gum (tie-gum) with a 2-3mm overhang on each side. Stitch from the center outward.
• Application: Align the precure tread strip perfectly. Joints must be dry and buffed. Secure the splice with staples.
• Edge Dressing: Use poly-film or canvas on the edges to prevent the envelope from sticking to the cushion gum during curing.
9. Enveloping and Rim Mounting
• Select the correct Envelope, Inner Tube, and Curing Flap.
• Ensure the envelope is centered and the tube valve is at a 90° angle to the envelope valve for easy coupling.
• Vacuum Test: Inflate the inner tube (max 0.3 MPa) and vacuum the envelope. If leaks are detected, check the seal or for envelope punctures immediately.
10. Vulcanization (The Curing Process)
• Connect the tire to the chamber's quick-connect couplings and ensure safety valves are open.
• Parameters: Standard curing temperature is between 110°C and 120°C.
• Pressure Management: Once the temperature is reached, apply envelope pressure and start the 180-minute timer.
• Monitoring: Check for leaks every 20 minutes. A single leaking tire can compromise the quality of the entire batch.
• Exhaust: Do not open the autoclave until the internal pressure has reached zero.
11. Final Inspection and Finishing
• Allow tires to cool on the monorail before removing the envelope.
• Disassembly: Use gloves; never pull by the valve stem as this damages the equipment.
• Quality Check: Inspect for bulges, deformations, or under-cured rubber at the joints/shoulders. Verify the internal patch is fully vulcanized.
• Pressure Test: Perform a final high-pressure inflation test.
12. Safety and Maintenance
• PPE: Operators must wear gloves, dust masks, earplugs, and safety glasses.
• Fire Safety: Smoking and open flames are strictly prohibited.
• Housekeeping: Buffing dust must be cleared daily; accumulated rubber dust is highly flammable.
• Solvents: Cement mixing should be conducted in a dedicated, ventilated explosion-proof room.
Why Choose Precure Retreading?
By following this rigorous 12-step process, retreaded tires offer a performance-to-cost ratio that is unbeatable for commercial fleets. It reduces environmental waste while ensuring the safety and reliability of your transport operations.
Looking for professional retreading equipment or materials? Contact us today!
GET IN TOUCH
- Call Now+86-18866769106
- Chat Now+86-18866769106
- Mail Nowpangxuemei_cn@outlook.com
- AddressNo.156 Donghuan Road,Zhucheng City,Shandong Province,China.